24/45
)
)
)
)
)
)
)


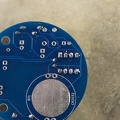
Soldering one leg first and checking that the socket is flat against the board avoids a simple mistake.
If it is not flat, or otherwise misaligned simply re-heating the leg will help correct the issue.
Once orientation and alignment is verified, solder the remaining legs.
Sometimes a small shim, such as the black foam here, can help keep the board level and simplifies the task.
- Author
- Chris Luke
- Created on
- Sunday 26 November 2017
- Posted on
- Sunday 26 November 2017
- Dimensions
- 2048*1365
- File size
- 821 KB
- Albums
- Visits
- 45295